Port Forwarding a HikVision DVR/NVR
Updated: 05 September 2021
Hikvision DVRs and NVRs use ports 8000, 554 and 80 for remote services. The remote app used to connect from iPhone or an Android phone is called iVMS 4500, It is available on the Play Store and App Store and made by Hikvision. Android users can also download the mobile app from the Hikvision App Store. It can be used to connect to your DVR/NVR directly by opening ports or through a HikConnect account- A DIY setup for remote viewing designed to make things easier.
Lets get down to ports needed for remote viewing. Essentially you will need to forward 2 ports – 8000 and 554. Port 8000 is used to send control commands to the DVR and 554 is the rtsp port used to stream video across the connection. There is also the web port (80) which can be forwarded if you want to view or use your DVRs web interface.
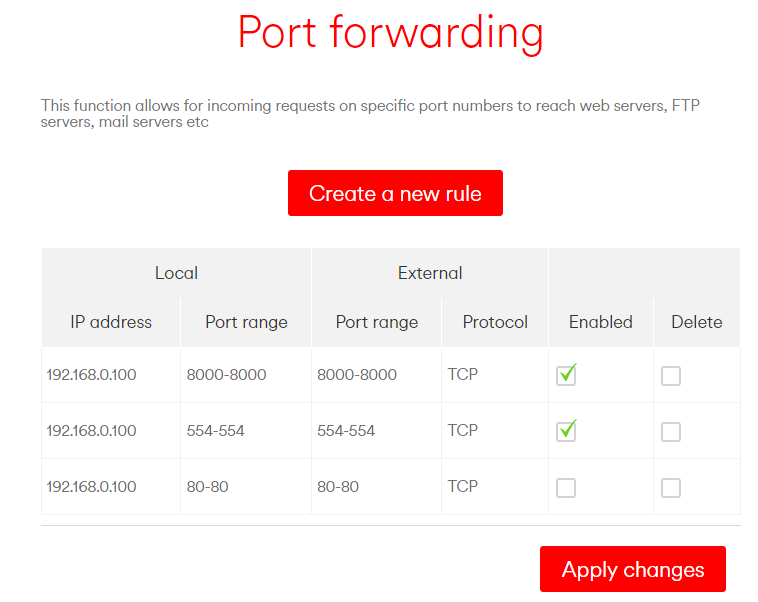
The example above assumes your DVR has a local IP of 192.168.0.100.
It is not necessary to open the exact same ports numbers externally and these can be changed as necessary. For example, if we want to connect from the outside world on port 9991 instead of 8000, we could assign a different external port as follows;
External Port Range: 9991-9991
Local Port Range: 8000-8000
Local Address: 192.168.0.100
Once you have forwarded these ports you can connect to your DVR with the public port 9991 which will direct to your DVR on 192.168.0.100 on port 8000.
How to test if your port forwarding is working
Once you have forwarded the necessary ports you can use a service like canyouseeme to check if the service on the port is responding. It will tell you if your port is open and the the dvr is talking back. Canyouseeme will automatically detect your WAN IP, so you will need to simply type in the external port that you have forwarded.
When you have multiple HikVision DVR’s in the same network
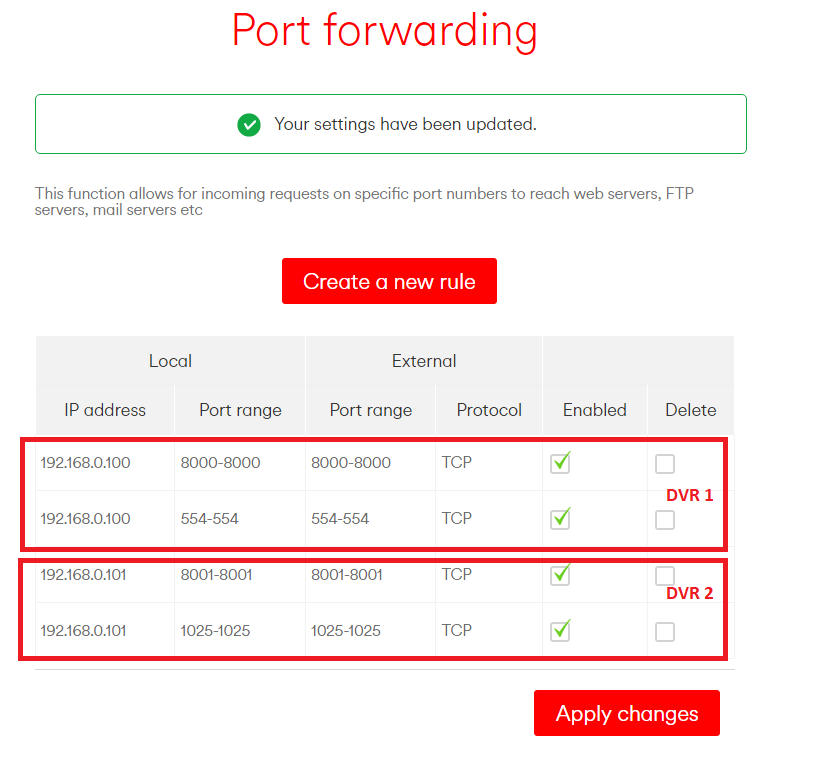
When you have multiple DVR’s within the same network you will need to use a different port configurations for each DVR. Lets take an example of 2 DVR’s on our network, DVR 1 and DVR 2. First we will setup the IP addresses for the 2 DVR’s and their media ports as follows:
DVR 1 Configuration
DVR IP: 192.168.0.100 (Static)
Media Port: 8000
RTSP Port: 554
Web Port: 80
DVR 2 Configuration
DVR IP: 192.168.0.101 (Static)
Media Port: 8001
RTSP Port: 1025
Web Port: 80
PS: The configuration can be found in the Network section of the DVR. Usually found under Configuration > Network
In the above example we have given both of the DVR’s a separate static IP and we are forwarding separate ports to the required DVR’s. You can use any port as long as they are not reserved or currently being used. To make the above example work, we will change our external ports on our port forwarding pages to reflect the new media and rtsp port numbers.
Conclusion
Directly port forwarding your router and connecting to your device skips the “middle man” configuration and allows you to talk to your CCTV video recorder directly. It is the fastest and safest method. If you are really worried about security we recommend you purchase a decent security firewall router and enable IP filtering. This will restrict connections to a single IP/Range of IPs. If you have a dynamic IP, you could register with a VPN service which can offer you a static IP and further encrypt data transmitted between you and your DVR. Alternatively you could VPN to your router and watch video with a local IP and avoid the port forwarding hassle altogether! Good Luck!
Visit CCTV101 for expert advice on CCTV & Security